Whether you're creating a new Salesforce instance for your team or refreshing an existing one, configuring the platform correctly is critical to creating a successful and repeatable sales process.
The ease of which you capture and leverage information about your contacts, leads, and accounts is critical to optimizing engagement, improving revenue forecasts, and accelerating revenue. However, setting up an expansive CRM system to match your team's unique needs can be tricky. A poorly configured Salesforce instance can create 10x more of a headache than it saves. We're here to share best practices with you so you can understand the basics of how to set up your Salesforce instance, apply it to your unique needs, and get your team running on all cylinders.
This blog will primarily explore the strategy behind an effective Salesforce sales process. Before we dive in, let's cover the technical steps needed to configure your first process within Salesforce.
How to set up a sales process in Salesforce
- From Setup, click Customize -> Opportunities -> Sales Processes
- Click New
- Create a Master process if this is your organization's first process
- Name your sales process something descriptive and unique (such as Inside Sales)
- Add an optional description and click Save
- All stages are included in a new process. Remove stages that you don't want to include by clicking the stage name in the Selected Values area and then clicking the Remove arrow to move the unwanted stage to the Available Values area. For more detail on this step, read Step #2 in this guide.
- Click Save
Every company is unique, but all companies want to find, win, and keep customers. The steps your team takes to accomplish this make up your sales process. The best sales leaders have a firm understanding of how a prospect moves through each stage of their sales process on their way to a purchase. A CRM, like Salesforce, tracks that prospect as s/he travels through the buyers' journey on the way to becoming a customer. With a well-run Salesforce instance, leaders can optimize team performance around what's working, track funnel health in real-time, and identify opportunities for growth.
How do you get there?
The following 3 steps are foundational to setting up a sales process in Salesforce using their standard object model.
1. Understand Salesforce's standard object architecture
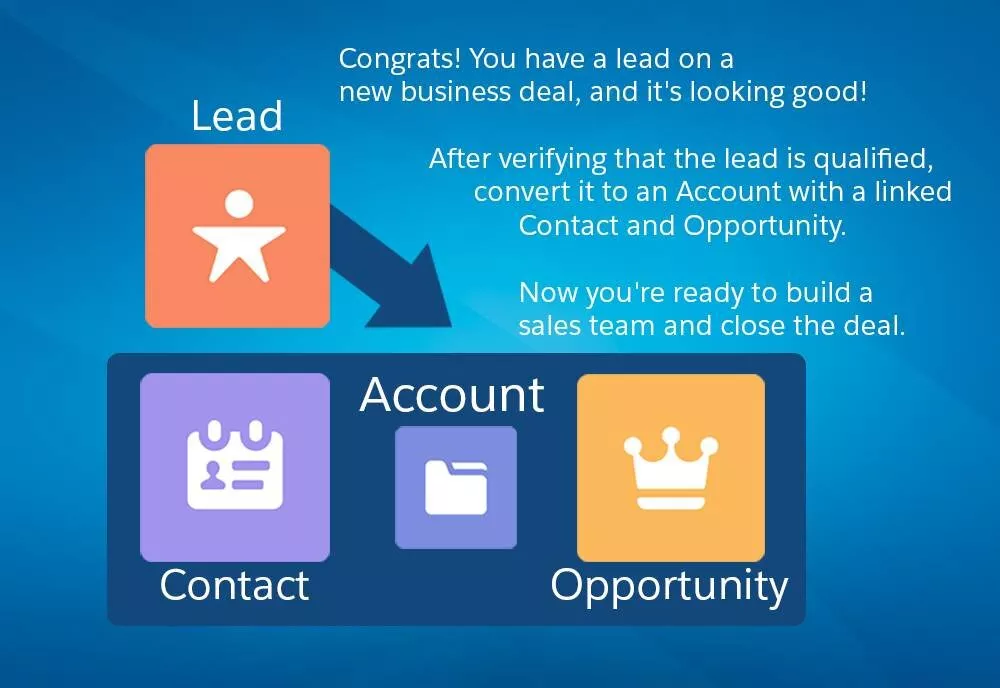
Salesforce tracks sales data using object architecture, which means information is stored as Leads, Contacts, Accounts, and Opportunities. Get to know these 4 objects, as they will represent different stages in your Sales Process.

- Leads are the handoff mechanism between marketing and sales. These people have an unknown fit or interest in your products or services. When a prospect is a Lead, sales reps are working to complete early qualification before the deal officially enters the pipeline.
- Contacts are people associated with an account who matter to your business. These can be decision makers, champions, influencers, or other important personas.
- Accounts are used to capture company information such as name, website, and location. These are companies that you have a relationship with and are potential customers, which can include prospects, partners, and competitors.
- Opportunities are potential revenue-generating sales deals that you want to track until the deal closes.
When you set up Salesforce, you'll map your prospects, customers, and companies to these standard objects. Doing so will give you the ability to track how leads and accounts are progressing through the funnel. When the prospect shows the right signals, you'll convert the lead into a contact and the account into an opportunity, which then puts you in the position to kick off more aggressive sales plays.
Other useful CRM terms to know
- Activities: The events and tasks that your sales reps manage in Salesforce are tracked as Activities. These can include sending an email to a prospect, making a call, or setting a meeting. You can track activities associated with a certain prospect or account, or track a rep's activities to see how productive they are over time.
- Custom Objects: Your organization's data might not fit into your CRM's existing standard objects. Luckily, Salesforce supports custom objects, which are objects that you create to store information that's specific to your company or industry. For example, a financial services company might create a custom Relationship object to track how contacts and accounts at various levels influence and interact with each other at each stage in a deal. It's important to note that the custom objects and workflows in Salesforce have limitations. Salesforce offers versions of the CRM that are customized to align with industry-specific workflows and objects, like Salesforce for Financial Services Cloud.
Once you understand the basic Salesforce architecture, you can begin mapping standard and custom objects to your organization's selling path.
2. Map your selling path
Now that we've defined each object, let's look at how to map your unique selling path within the Salesforce platform. In order to do this, you'll have to take a step back and reflect on your selling process, define the most important events and activities, and identify which should be tracked consistently.
Lead stages

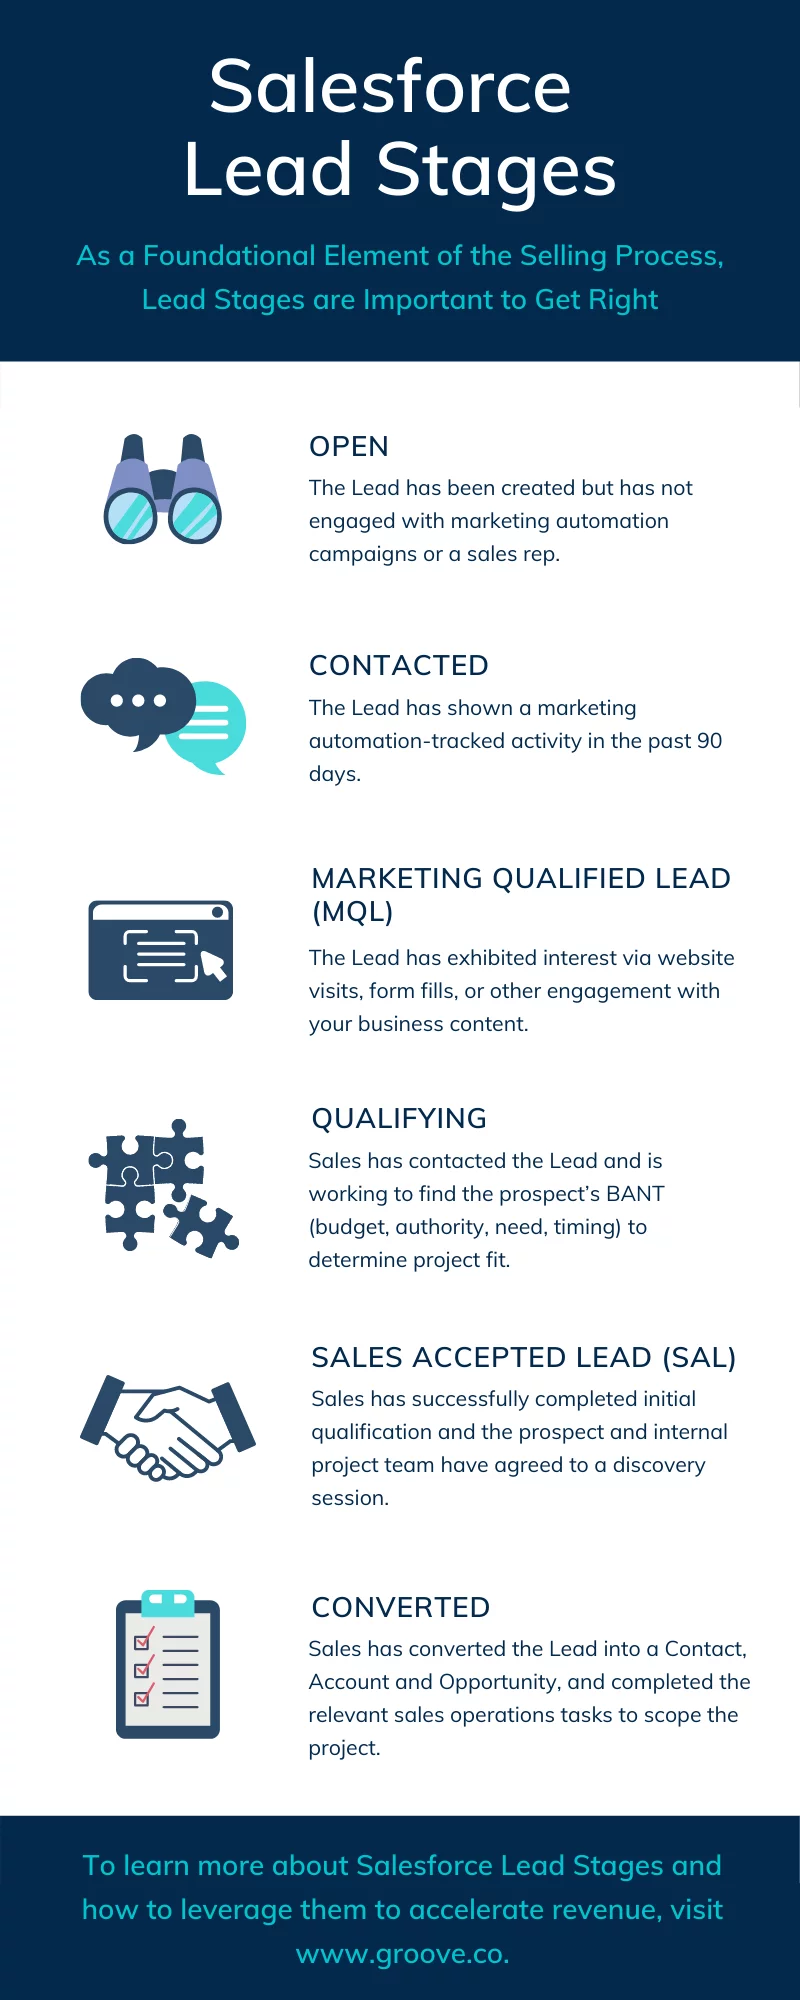
As a foundational element of the selling process, Lead stages are important to get right. Start off by reverse-engineering your best deals back to the first touchpoint with your sales team:
- Where did the lead come from?
- What got them interested?
- What steps did you take to qualify them?
- Did those steps include a product demo, consultation, quote request, or other meeting?
- Did they submit a form on your website?
Each meaningful step that you identify will become a lead stage. Here are a few common lead stages that you can use as a guideline for identifying and defining your own:
Account types
Once Sales converts the Lead into a Contact, it must be associated with an Account object. This is a place to store all data related to one company. We recommend that you configure different Account types using the standard "Type" field but with values customized to your business. When a Lead converts to an Account, the Account "Type" should be denoted as "Prospect" account or other similar value. Once the Prospect Account has a Closed Won Opportunity, you'll update the "Type" field with a value of "Customer" or "Active Client." With this method, for example, it's easy to create a report that provides a breakdown of Customer Accounts vs Non-Customer Accounts.
Opportunity stages
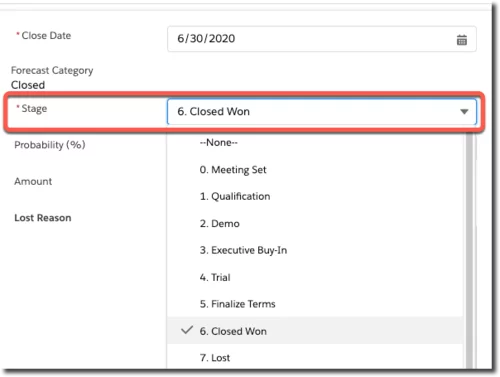
When an Account has the potential to turn into closed business, an Opportunity is created within the Account object. Multiple opportunities make up your sales pipeline, which contributes to your sales forecast. Defining which stages go into an opportunity starts with another reverse-engineering exercise.

Ask your team to identify the signals that indicate that a deal is more likely to close, such as a Request for a Proposal. Defining those signal points will help you identify which steps are critical to closing business. From there, associate each critical step to an opportunity stage in Salesforce.
Once your sales motions have been defined and mapped to Lead, Account, and Opportunity stages in Salesforce, your team has the foundation in place to consistently track sales data.
3. Establish an activity tracking process
You've set up the framework for a healthy Salesforce instance and now your team can start tracking activities and populating your CRM with valuable sales information. The key to success here is in setting expectations for your sales reps. Which activities should be logged? When should reps log them? How do you expect this to affect rep productivity? Have this conversation with your team early on and invite their input to identify process inconsistencies and inefficiencies before implementation.
Reps may be concerned that a new Salesforce process will slow them down and impact their ability to hit their number. These concerns are understandable, and it may take some work to get them on board.
One way to put reps at ease is by automating manual activity logging via a sales engagement platform or AppExchange app that logs activities to Salesforce automatically. This automation alone might convince reps to come around, as reps spend 66% of their time on repetitive tasks like data entry and note taking, according to Salesforce. Another way to increase rep efficiency is to connect your email inbox to Salesforce via Salesforce's connector such as a sales engagement platform. Connecting Salesforce to your email inbox eliminates the need to switch back and forth between systems, reducing friction and saving reps significant time. Finally, a sales engagement platform may also be able to automate the advancement of an opportunity stage based on actions like the creation of a discovery meeting in Google Calendar.
Final thoughts
Building a sales process in Salesforce takes time and energy, but the payoff is significant and provides a framework for continued sales and growth. Organizations that understand their unique selling path, define clear sales stages, and achieve strong adoption are more efficient, effective, and better at reaching their revenue goals.
Go forth! It’s time to get building.
Want to learn how to automate Salesforce sales stages? Request a demo.


